Wow, I'm blogging a lot lately! I'm also cooking a lot. Been working from home, so I have more time and energy to putz around the kitchen. FINALLY found a recipe for chai concentrate. I love chai, but I refuse to pay for the overpriced concentrate at the store, and splurging on it at a coffee shop is just an occasional thing (plus, it's always caffeinated at a coffee shop).
Here's the link to the original recipe, but I'm going to post my changes, and I'll probably continually refine this as I refine the recipe. So this is really for my reference, but you're welcome to it.
Homemade Chai Concentrate
Yields: 1 batch of concentrate, approximately 4 cups
4 1/2 cups water
8 bags black tea – (I used lipton)
2-3 cinnamon sticks
1/2 cup sugar (IF you're planning on using this as a cold chai. If hot, I would use much much less. I found this amount of sugar much too sweet this morning, and you can always you can add more sugar in a hot drink)
1 – 3-inch section of fresh ginger, cut into pieces
10 whole cloves
10 cardamom pods
1/2 teaspoon freshly ground nutmeg
generous 1/2 teaspoon of whole black peppercorns
1 tsp vanilla (optional) (I didn't especially care for it today, but tomorrow is another day)
Add the water and sugar to a medium sized saucepan and bring to a
boil over a medium-high heat. Once boiling, reduce the heat to a simmer
and put in the tea bags, spices, and cinnamon sticks. Simmer
for 20 minutes.
Remove the pan from the heat. Take out the tea bags and the big chunks of stuff, and let it cool for a bit. Add the vanilla now if you're using. Strain the concentrate through a sieve into a 1-qt mason jar. May need to use a funnel.
Store in
the refrigerator for up to one week.
To serve, mix 1 part concentrate with 1 part milk of your choice. Heat for a warm beverage or serve over ice for a cold drink.
Showing posts with label my favorite recipes. Show all posts
Showing posts with label my favorite recipes. Show all posts
Wednesday, November 16, 2011

Thursday, November 10, 2011
Broiled Brussels Sprouts with Hazelnuts
From Mark Bittman's blog
Heat the broiler. Trim about a pound of Brussels sprouts and pulse in a food processor—or use a knife—to chop them up a bit. Spread out on a rimmed baking sheet, drizzle with two tablespoons olive oil, sprinkle with salt and pepper, and toss. Broil the sprouts for about five minutes, until browning on the edges. Meanwhile pulse a handful of hazelnuts (or chop them). Shake the pan to flip the sprouts, add the nuts and broil for another three minutes. Sprinkle with freshly squeezed lemon juice and plenty of fresh parsley.
RESULTS:
this was really good, and just a hair easier than the other Brussels sprout recipe I dig. Just be careful that brown on the edges doesn't turn into black all over--I had mine on the low broil setting and they charred pretty quick on the top rack. Next time, I'll be careful to only put them on the top rack for a minute or so, and then one rung below after that, especially after the nuts (I used walnuts) are added. To turn it into a full lunch, I tossed the sprouts with pasta, a little more oil, lemon juice, and some cheese (feta and parmesan). Yum! The pan didn't even need too much cleaning. Easy peasy.
Sunday, October 2, 2011
Baked Oatmeal
Kathleen found this recipe on the Fooducate Blog.
Dry ingredients:
Enjoy hot, cold, or room temperature. If well covered, this will keep in the fridge for one week.
RESULTS: This was a really nice Sunday breakfast, and the leftovers will make a great second breakfast for the rest of the week (infinitely better than the dried-out muffins that show up at work). I used a couple of the amazing apples Tiff gave me from her dad's orchard. I cooked it exactly to the instructions, and I think I could have left it in there a little longer after taking the foil off to get a nice golden crust (my oven seems to run a little cool, though). I drizzled just a little syrup over the top of my piece, because that's how I roll, but it really didn't need the extra sweetness. When Kathleen made it, she thought it was a a bit dry, but she used dried blueberries and coconut as the fruit, which I think would suck up a fair amount of moisture. So maybe if you want to use dried fruit, either let them soak for a while to plump up or add more liquid.
Dry ingredients:
- 2 cups old fashion oats
- 1/2 tsp baking powder
- 1/4 tsp baking soda
- 1/4 tsp salt
- 1 tsp allspice
- 1/2 tsp cinnamon
- 2 1/2 cups sliced fruit
- 1 cup milk
- 1 cup plain yogurt
- 2 eggs
- 1/4 cup maple syrup, honey, brown sugar, or sugar
Enjoy hot, cold, or room temperature. If well covered, this will keep in the fridge for one week.
RESULTS: This was a really nice Sunday breakfast, and the leftovers will make a great second breakfast for the rest of the week (infinitely better than the dried-out muffins that show up at work). I used a couple of the amazing apples Tiff gave me from her dad's orchard. I cooked it exactly to the instructions, and I think I could have left it in there a little longer after taking the foil off to get a nice golden crust (my oven seems to run a little cool, though). I drizzled just a little syrup over the top of my piece, because that's how I roll, but it really didn't need the extra sweetness. When Kathleen made it, she thought it was a a bit dry, but she used dried blueberries and coconut as the fruit, which I think would suck up a fair amount of moisture. So maybe if you want to use dried fruit, either let them soak for a while to plump up or add more liquid.
Sunday, August 7, 2011
Taco seasoning
Plan A was to grill some hamburgers, but the big black rainclouds made us think better. I was out walking Harper before the rain started, and I promise you the temperature dropped 5 degrees in the span of a minute. Anyway, Plan B was then to make tacos, but upon arriving home from the store we realized we forgot taco seasoning (in addition to whole wheat flour and I'm sure a dozen other things that I meant to put on the list but didn't). Like the good husband to a mother-to-be that he is, Chris was all prepared to go back out in the storm to get some, but then, Internet to the rescue! I found the following on allrecipes.com. We think this recipe makes the equivilent of one taco seasoning packet. After you drain the fat from the browned meat and sprinkle this on (start with half and then work up to all of it, just in case it's too spicy), add about 2/3 cup of cold water with a little corn starch (I don't know, somewhere around half a teaspoon to a teaspoon?) dissolved in the water and let the water cook down.
- 1 tablespoon chili powder
- 1/4 teaspoon garlic powder
- 1/4 teaspoon onion powder
- 1/4 teaspoon crushed red pepper flakes (I would ease up on this a bit and only add more if you think you need it)
- 1/4 teaspoon dried oregano
- 1/2 teaspoon paprika
- 1 1/2 teaspoons ground cumin
- 1 teaspoon sea salt
- 1 teaspoon black pepper
Thursday, April 14, 2011
Spaghetti with Lemon and Olive Oil [Spaghetti al Limone]
From Smitten Kitchen (including notes before recipe)
This is one of those recipes that are almost better off without one — every ingredient can be adjusted to taste and the technique is just tossing everything about. I consulted a bunch of recipes but ended up being lured in by Cook’s Illustrated’s January 2011 version, as it had so much less heavy cream and olive oil than the others and the threat of bathing suits was a mere 48 hours away! But, I ended up not using the recipe as more than an outline; I didn’t think shallots belonged in the dish, I wanted more lemon juice and I didn’t care for their resting technique — the cheese just glued itself to the pot and not the noodles when I did this — the “toss, toss, toss!” method I used in last year’s Cacio e Pepe does a better, quicker job.
While pasta is cooking, zest lemons until you have a little shy of a tablespoon of zest. Juice lemons — you’ll have anywhere from 1/3 to 1/2 cup lemon juice.
Drain pasta, reserving 1 1/2 cups of pasta cooking water. Dry out your pot, then boil the olive oil, cream, zest and 1 cup of the reserved pasta water together for two minutes over high heat. Return pasta to pot and stir until coated. Add the cheese and 1/4 cup lemon juice and toss, toss, toss everything together. Add more pasta water, 1/4 cup at a time, if you’d like your dish a little looser. Quickly taste a strand of pasta and see if you want to add the remaining lemon juice (we did). Stir in basil or arugula and season generously with salt and pepper.
Serve immediately, drizzling individual portions with a bit of extra olive oil and sprinkling with extra Parmesan cheese.
RESULTS:
Love love love. Definitely making this one again. It's nice and spring-y, which is a nice change from the spaghetti with cheese and black pepper that I love to make, but which is much more winter-y. Some nice green peas tossed in there wouldn't be amiss, I don't think, and it would add a little more color.
This is one of those recipes that are almost better off without one — every ingredient can be adjusted to taste and the technique is just tossing everything about. I consulted a bunch of recipes but ended up being lured in by Cook’s Illustrated’s January 2011 version, as it had so much less heavy cream and olive oil than the others and the threat of bathing suits was a mere 48 hours away! But, I ended up not using the recipe as more than an outline; I didn’t think shallots belonged in the dish, I wanted more lemon juice and I didn’t care for their resting technique — the cheese just glued itself to the pot and not the noodles when I did this — the “toss, toss, toss!” method I used in last year’s Cacio e Pepe does a better, quicker job.
- 1 pound spaghetti or linguine
- Salt
- 3 lemons
- 1/4 cup extra virgin olive oil , plus additional for serving
- 1/4 cup heavy cream
- 1 ounce finely grated Parmesan cheese (about 1/2 cup), plus additional for serving
- Ground black pepper
- Small handful fresh basil or arugula (what I used, deliciously, in a pinch) leaves, shredded
While pasta is cooking, zest lemons until you have a little shy of a tablespoon of zest. Juice lemons — you’ll have anywhere from 1/3 to 1/2 cup lemon juice.
Drain pasta, reserving 1 1/2 cups of pasta cooking water. Dry out your pot, then boil the olive oil, cream, zest and 1 cup of the reserved pasta water together for two minutes over high heat. Return pasta to pot and stir until coated. Add the cheese and 1/4 cup lemon juice and toss, toss, toss everything together. Add more pasta water, 1/4 cup at a time, if you’d like your dish a little looser. Quickly taste a strand of pasta and see if you want to add the remaining lemon juice (we did). Stir in basil or arugula and season generously with salt and pepper.
Serve immediately, drizzling individual portions with a bit of extra olive oil and sprinkling with extra Parmesan cheese.
RESULTS:
Love love love. Definitely making this one again. It's nice and spring-y, which is a nice change from the spaghetti with cheese and black pepper that I love to make, but which is much more winter-y. Some nice green peas tossed in there wouldn't be amiss, I don't think, and it would add a little more color.
Monday, May 17, 2010
Kale Chips a la me
I've been tweaking and experimenting, and this is the kale chip recipe I've decided I like.
Jean was also wondering if they could be made with chard. I have a love-hate thing with chard. Sometimes I really dig when you make something with the leaves and then you have the ribs left over to do with what you will. Bonus vegetable! But other days those ribs are a burden, and I feel shackled by the responsibility of having to do something with them so soon after using the leaves. So I haven't tried it, but you are welcome to. Let me know.
- 1 bunch Organic Kale (ie, enough to be laid in a single layer on two baking sheets).
- 1.5ish TBS Extra Virgin Olive Oil
- 1 small glug sesame oil
- 1 tsp Balsamic Vinegar
- 1/2 tsp table salt
- preheat oven to 300 degrees
- Rinse kale and pat dry with a paper towel or take it for a spin in a salad spinner. Cut off stems and tear leafs off of the rib. Throw away the center rib pieces and set aside.
- In a large bowl whisk together oil, vinegar and salt and add the kale. Gently AND THOROUGHLY toss. The kale has to be evenly coated or you'll get giant salt deposits. Not good.
- Divide kale among two baking sheets (parchment paper unnecessary, but I would wash the sheets not too long after using them). It's important that the kale is in a single layer or you'll get soggy kale.
- Bake for 20 minutes until crispy. If you have some pieces that aren't dried yet, take off the ones that are and stick the undone leaves back in for a couple minutes.
Jean was also wondering if they could be made with chard. I have a love-hate thing with chard. Sometimes I really dig when you make something with the leaves and then you have the ribs left over to do with what you will. Bonus vegetable! But other days those ribs are a burden, and I feel shackled by the responsibility of having to do something with them so soon after using the leaves. So I haven't tried it, but you are welcome to. Let me know.
Sunday, February 21, 2010
Easy Chai Tea

I got this from a Real Simple magazine someone left on the break table at work. The March 2010 issue, I believe.
Makes 4 cups
Hands-On Time: 05m
Total Time: 20m
Ingredients
* 8 cardamom seeds
* 8 cloves
* 4 black peppercorns
* 2 cinnamon sticks
* 1 1-inch piece fresh ginger, sliced
* 2 cups whole milk
* 4 bags black tea (such as Darjeeling)
* 8 teaspoons sugar or more, to taste
Directions
1. Place the cardamom, cloves, and peppercorns in a resealable plastic bag and crush with a heavy skillet.
2. Place the crushed spices in a medium saucepan, along with the cinnamon sticks, ginger, milk, and 2 cups water; bring to a boil. Remove from heat, add the tea bags, cover, and let steep for 10 minutes.
3. Strain into cups. To each cup, add 2 teaspoons sugar or more, to taste.
You can make this tea and refrigerate it for up to 2 days. Reheat in a saucepan or a microwave.
Results:
I like this recipe because you can adjust the spices to how you like it. So, for example, I can make it with decaf tea and add more cloves, whereas Bethie can make it with her crazy lactose-free milk. Crushing the spices in the bag didn't work so well; the spices are sort of pointy, and they ripped holes in the plastic. I think one of those mortar and pestles would work great, or a spice grinder. This might turn out to be reason enough for me to finally invest in one of those.
Saturday, February 13, 2010
Spaghetti with cheese and black pepper (or Spaghetti cacio e pepe if you want to sound impressive)
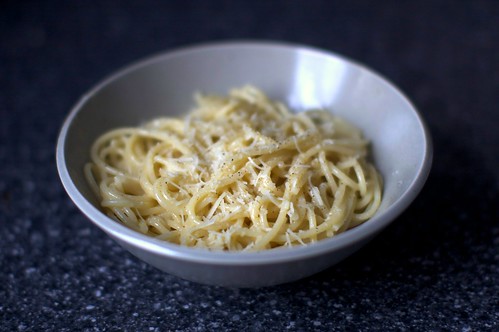
Bethie sent this to me from Smitten Kitten:
Adapted very loosely from Mario Batali
As I’ve mentioned, for something with such a simple ingredient list this dish manages to fall all over the map. Some versions use just oil, no butter, some use neither oil of butter; some stud the sauce with large, barely cracked peppercorns and half-melted pebbles of romano; some opt for a smoother cheese, cacio de roma, which I located, auditioned and discovered I liked the saltier and more accessible Pecorino Romano better. There are a lot of ways to approach the dish and people who will find something inauthentic with each of them. I say ignore them all and just enjoy your spaghetti.
Serves 4 as a main, 8 as a first course
1/4 cup olive oil
1 pound dried spaghetti
2 tablespoons butter
4 ounces Pecorino Romano cheese, finely grated
1 1/2 teaspoon finely ground black pepper
Salt (optional)
Cook spaghetti in well-salted water to your al dente tastes in a large, wide-bottomed pot. (You’ll have fewer dishes to wash if you use this pot to assemble the dish as well.) Drain spaghetti, reserving 1 1/2 cups of pasta cooking water.
Dry out your pot, then heat the olive oil over high heat until almost smoking. Add drained spaghetti and 1 cup of reserved pasta water and jump back, this will splatter mightily, also known as “I made this three times, and never once learned my lesson. Do as I say, not as I do.”
Add butter, 3 ounces cheese and ground pepper and toss together with tongs. Taste, adding more pasta water, cheese, pepper or salt (which should not be neccessary, as Romano is very salty) to taste.
Serve immediately, sprinkling with reserved cheese and an extra grind or two of black pepper.
RESULTS: This was really easy and the taste, proportionally, was way impressive for the work put into it. Chris had concerns about the pouring spaghetti and water into hot oil thing, but I was using our really tall spaghetti pot and I had the lid on hand to slap over the top immediately and minimize disaster.
When I read the recipe, I was thinking, what's the big difference between this and just putting butter and cheese over spaghetti our your plate? I think the pasta water makes all the difference. It comes out looking and tasting like a less-heavy cheesy alfredo sauce. We were in a hurry to eat, so I didn't make any vegetables or meat to go with this, but I think you really need it. It's just a little too plain to eat as an entire meal, but it would be delightful as a side to sauteed mushrooms or some fish or chicken. (So says me. Chris, who happily makes himself pasta and butter for dinner each and every time I don't cooks something believes it wasn't plain at all.)
Subscribe to:
Posts (Atom)