No-bake chocolate cake
This is on the to-do list. I seem to be accumulating more things on the to-do list than I am actually to-doing. Part of the reason, I think, is that while I've been having an awful lot of appetite for breakfast (and second breakfast, and elevensies), I generally haven't had so much appetite for post-noon meals. Also, I don't think my midwife would approve of me eating this cake for elevensies, as would inevitably happen if I were to make it. So I'll file it away for some lucky future dinner party when I have the pretense of cooking for others to warrant making something that will, of course, need to be eaten the next morning asap before it goes bad. Of course.
Notes to self: berries or bananas on the bottom?
UPDATE 9/6
Results:
This was actually really disappointing. It didn't set very firmly, even after an overnight stint in the fridge. There was way too much salt in it, and it was really nothing more than the inside of a truffle, but a serving was so huge that you got tired of the chocolate (I know, crazy talk!). Anyway. Skip.
Showing posts with label dessert. Show all posts
Showing posts with label dessert. Show all posts
Tuesday, September 6, 2011

Friday, July 8, 2011
Double Nutella Kulfi (basically, Indian-style ice cream)
From this website, sent to me by my friend Aimee. The pictures are helpful.
serves 8, in conical kulfi moulds 9 cm high
Ingredients
- 300 ml of fresh cream to whip
- 1/2 cup of sugar
- 275 ml of evaporated milk (I used full fat, but if you try this with low fat, let me know how it goes)
- 250 gms Nutella (or or taste) plus 4 tbsp melted Nutella in 1 tbsp of hot milk to drizzle
Directions
- Whip cream and sugar together to stick peaks
- Stir in Nutella and evaporated milk. You'll lose your peaks and it'll look foamy.
- Pour into Indian Kulfi molds, yogurt containers, ramekins, or anything else. If you don't use the kulfi molds, put plastic wrap over the containers and press against the cream so you don't get ice crystals.
- Freeze overnight
- Before serving, top with 4 Tbsp melted Nutella mixed with hot milk. Toasted hazelnuts are also good.
I made this for my birthday yesterday. I actually halved the recipe (which was difficult considering I was also doing ml to oz conversions--I gave up on trying to figure out how much Nutella to put it), which I decided is more like frozen mousse than ice cream, although it's close enough to ice cream that one wonders why anyone would ever need ice cream. It turned out VERY rich, Chris and I together couldn't finish half a serving. I wonder if a lighter evaporated milk would help, but then I also wonder what that would do to the consistency of the finished product. Let me know if you try it. In the future, I think I'm not going to worry as much as I did about getting the Nutella completely mixed in. It's impossible to do, for one thing. For another, the parts that didn't get mixed in ended up being really delightful crunchy bits in the ice cream. All in all, really easy, really good, and really rich, and no special equipment required.
Sunday, June 19, 2011
Raspberry Rhurbab Lattice Pie
From Martha. Again. There's a whole section of rhubarb recipes on her site.
Ingredients
Tiff, this is for you! I made this for a backyard bbq that was tons of fun, even when torrential rain drove us inside. last I heard it was 4 inches in 2 hours! Chris and I saw Noah and his ark on the way home on Clairemont, he was stopping to assist the passengers of a car that stalled out. Anyway, back to the food. I sort of followed this recipe. I used the full Pate Braise recipe for the pie crust. I think the filling is variable, I used it mostly as a guide to sugar amounts, cooking time and temp, and "total fruit volume." I only had about 1 cup of raspberries, so I made the rest up with more rhubarb. Briefly considered using some of the farmer's market strawberries I brought home that morning, but decided that would be a waste of amazing strawberries. I also wondered what blueberries would taste like in there. Anyway, after consulting my Flavor Bible, I discovered that rhubarb also loves vanilla and ground ginger, so I put a splash and a pinch of both in, respectively. Next time I might make it two splashes and two pinches. I completely forgot about doing the cream and egg wash, as I usually do. Despite that, the pie turned out great, especially with some friends' homemade buttermilk lemon sorbet.
Ingredients
- 1/3 cup all-purpose flour, plus more for dusting
- 1 1/2 pounds rhubarb, trimmed and cut into 1/2-inch pieces (4 cups)
- 2 cups raspberries
- 1 1/4 cups sugar, or more to taste
- Freshly squeezed juice of 1/2 lemon
- 1 tablespoon cold unsalted butter, cut into small pieces
- 1 large egg, lightly beaten
- 2 tablespoons heavy cream
- Preheat oven to 350 degrees.
On a lightly floured surface, roll out one half of dough for bottom crust. Fit into an 11-inch pie plate. Trim pastry using scissors or a sharp paring knife, and chill. Keep remaining half of dough, which will be used to make the lattice, refrigerated and wrapped in plastic. - Combine rhubarb and raspberries in a large bowl. Sprinkle with sugar, flour, and lemon juice. Toss gently so as not to break raspberries. Spoon into pie shell, and dot with butter. Refrigerate while preparing lattice top.
- In a small bowl, combine egg and heavy cream, whisking lightly; set aside. On a lightly floured surface, roll out remaining piece of dough for lattice, and cut it into 1-inch strips. Weave strips together over filling, and place an extra strip or two along the edge, where the bottom crust joins the lattice top; press this strip with tines of a fork to seal well. Brush lattice and all pastry edges with egg glaze, sprinkle top with sugar, and place pie on a parchment paper's lined baking sheet.
- Bake until pastry is golden brown and juices in center of pie are bubbling, 1 1/4 to 1 1/2 hours. Transfer to a wire rack to cool before serving.
Tiff, this is for you! I made this for a backyard bbq that was tons of fun, even when torrential rain drove us inside. last I heard it was 4 inches in 2 hours! Chris and I saw Noah and his ark on the way home on Clairemont, he was stopping to assist the passengers of a car that stalled out. Anyway, back to the food. I sort of followed this recipe. I used the full Pate Braise recipe for the pie crust. I think the filling is variable, I used it mostly as a guide to sugar amounts, cooking time and temp, and "total fruit volume." I only had about 1 cup of raspberries, so I made the rest up with more rhubarb. Briefly considered using some of the farmer's market strawberries I brought home that morning, but decided that would be a waste of amazing strawberries. I also wondered what blueberries would taste like in there. Anyway, after consulting my Flavor Bible, I discovered that rhubarb also loves vanilla and ground ginger, so I put a splash and a pinch of both in, respectively. Next time I might make it two splashes and two pinches. I completely forgot about doing the cream and egg wash, as I usually do. Despite that, the pie turned out great, especially with some friends' homemade buttermilk lemon sorbet.
Monday, May 30, 2011
Banana Ice Cream
This is amazing. Basically, you just freeze banana slices for a couple hours and then grind them up, and you get banana ice cream. I tried it with the blender first, which didn't work because there wasn't any liquid to keep the solids moving down to the blade, and then I tried my mini-food processor, which worked but the bananas made their way up under the blade into the shaft, and I'd be worried about it sticking up the motor. Next time, I'll try either the full sized food processor or maybe even my immersion blender. Let me know if you try it with the immersion blender before I get to it!
Saturday, May 28, 2011
Mini Rhubarb and Raspberry Galettes
From Martha
Yield Makes 8
Ingredients
Directions
I got to work on Friday and saw about 10 pounds of free rhubarb to be given away, so I grabbed a bunch and thought I'd make a pie. The problem is, although we COULD eat a whole pie, we probably shouldn't. So then I was trolling the internet this morning to find a recipe for mini-pies, either in a small cast iron skillet or muffin pans or something. I wasn't quite sure. Then I stumbled across this recipe for galettes, which was so perfect because you don't need to risk having the wrong sized pan and risk having to fiddle with cooking time and temperature. Also, it's easy to halve the recipe, and then you only have to share the equivalent of a half a pie between two people.
The flavors of this tart are right on. Really good and sour, but also sweet. Excellent. But here are some "do as I say, not as I do" tips. After forming the tarts and refrigerating (end of step 3), I left them in the fridge for a few hours instead of 30 minutes. This was bad because it gave the fruit more time to masticate in the sugar and juice was already running from them by the time I got around to cooking. Maybe freezing would keep them longer if you're not ready for baking? I'm not sure. Either way, make sure you either use a rimmed baking sheet or engineer some sort of tin foil juice catcher under your baking sheet because they'll probably leak a lot of juice which will then burn on the bottom of your oven and smell really bad.
After they were done baking, I had trouble picking them up with even a really big spatula to move to the baking sheet (possibly because the bottom crust was soaked through with juice, or possibly because I rolled the crusts too thin). I'm hoping the crust will harden up as they cool and won't stick too much to the parchment paper. Also, if you just can't wait for them to cool, and you happen to break part of a tart off as you move it to the cooling racks, remember before you gobble it up that hot sugary filling is REALLY HOT, even if the crust is already cool. Also, be sure to wash any and all cooking implements that come into contact with the hot sugary filling IMMEDIATELY before the sugar cools, or you're going to have issues. And the sugar cools fast.
Yield Makes 8
Ingredients
- Pate Brisee, do not divide into 2 disks
- All-purpose flour, for dusting
- 1 1/2 pounds trimmed rhubarb, cut into 1/4-inch pieces (about 5 cups)
- 8 ounces (about 1 1/2 cups) fresh raspberries
- 1/4 cup cornstarch
- 2 cups granulated sugar
- Coarse sanding sugar, for sprinkling
Directions
- Divide dough evenly into 8 pieces. On a lightly floured surface, roll out each piece to a 7-inch round, 1/8 inch thick. Transfer rounds to 2 large parchment-lined rimmed baking sheets (don't use silicon!), arranging several inches apart. (If rounds become too soft to handle, refrigerate until firm, about 20 minutes.)
- In a large bowl, toss to combine rhubarb, raspberries, cornstarch, and granulated sugar.
- Cover each round of dough with a heaping 1/2 cup rhubarb mixture, leaving a 1-inch border. Fold edges over rhubarb filling, leaving an opening in center; gently brush water between folds, and press gently so that folds adhere. Refrigerate or freeze until firm, about 30 minutes.
- Preheat oven to 400 degrees. Brush edges of dough with water, and sprinkle with sanding sugar. Bake until crusts are golden brown, about 30 minutes. Reduce heat to 375 degrees, and bake until juices bubble and start to run out from center of each galette, 15 minutes more. Transfer to a wire rack, and let cool completely before serving.
I got to work on Friday and saw about 10 pounds of free rhubarb to be given away, so I grabbed a bunch and thought I'd make a pie. The problem is, although we COULD eat a whole pie, we probably shouldn't. So then I was trolling the internet this morning to find a recipe for mini-pies, either in a small cast iron skillet or muffin pans or something. I wasn't quite sure. Then I stumbled across this recipe for galettes, which was so perfect because you don't need to risk having the wrong sized pan and risk having to fiddle with cooking time and temperature. Also, it's easy to halve the recipe, and then you only have to share the equivalent of a half a pie between two people.
The flavors of this tart are right on. Really good and sour, but also sweet. Excellent. But here are some "do as I say, not as I do" tips. After forming the tarts and refrigerating (end of step 3), I left them in the fridge for a few hours instead of 30 minutes. This was bad because it gave the fruit more time to masticate in the sugar and juice was already running from them by the time I got around to cooking. Maybe freezing would keep them longer if you're not ready for baking? I'm not sure. Either way, make sure you either use a rimmed baking sheet or engineer some sort of tin foil juice catcher under your baking sheet because they'll probably leak a lot of juice which will then burn on the bottom of your oven and smell really bad.
After they were done baking, I had trouble picking them up with even a really big spatula to move to the baking sheet (possibly because the bottom crust was soaked through with juice, or possibly because I rolled the crusts too thin). I'm hoping the crust will harden up as they cool and won't stick too much to the parchment paper. Also, if you just can't wait for them to cool, and you happen to break part of a tart off as you move it to the cooling racks, remember before you gobble it up that hot sugary filling is REALLY HOT, even if the crust is already cool. Also, be sure to wash any and all cooking implements that come into contact with the hot sugary filling IMMEDIATELY before the sugar cools, or you're going to have issues. And the sugar cools fast.
Pate Brisee
From Martha:
Yield
Makes two 8- to 10-inch single-crust pies or one 8- to 10-inch double-crust pie
Ingredients
I'm pretty sure that Pate Brisee is French for "pie dough." I haven't cooked the crust yet, but the dough itself tastes just like pie dough made with butter. :) This recipe finally prompted me to confront the food processor that I've been wanting for years and finally got for Christmas (thank you!!) but have been too intimidated by to move out of the store room, let alone take out of the box. Let me tell you, that was some wasted 6 months. It's an amazing machine. I just need to find space for it in the kitchen. Some of you might know this, but I used to be really good at making pie crust. I proved the saying "easy as pie." And then I went to college and somehow my pie crust making abilities got smooshed out by philosophy class. So I haven't made much pie since then, but I think this might turn it around. Stay turned for finished pie results....
Yield
Makes two 8- to 10-inch single-crust pies or one 8- to 10-inch double-crust pie
Ingredients
- 2 1/2 cups all-purpose flour
- 1 teaspoon coarse salt
- 1 teaspoon sugar
- 1 cup (2 sticks) chilled unsalted butter, cut in pieces
- 1/4 to 1/2 cup ice water
- Place the flour, salt, and sugar in the bowl of a food processor, and process for a few seconds to combine. Add the butter, and process until the mixture resembles coarse meal, about 10 seconds. With the machine running, add the ice water in a slow, steady stream, through the feed tube, just until the dough holds together. Do not process for more than 30 seconds.
- Turn the dough out onto a work surface. Divide in two. Place each half on a sheet of plastic wrap. Flatten, and form two discs. Wrap, and refrigerate at least 1 hour before using.
I'm pretty sure that Pate Brisee is French for "pie dough." I haven't cooked the crust yet, but the dough itself tastes just like pie dough made with butter. :) This recipe finally prompted me to confront the food processor that I've been wanting for years and finally got for Christmas (thank you!!) but have been too intimidated by to move out of the store room, let alone take out of the box. Let me tell you, that was some wasted 6 months. It's an amazing machine. I just need to find space for it in the kitchen. Some of you might know this, but I used to be really good at making pie crust. I proved the saying "easy as pie." And then I went to college and somehow my pie crust making abilities got smooshed out by philosophy class. So I haven't made much pie since then, but I think this might turn it around. Stay turned for finished pie results....
Friday, February 25, 2011
Roasted apples with yogurt and balsamic glaze
You may have noticed that I added a label called "food-heroin." You'll understand after you try this recipe. You can't stop after having one taste. I think it's so neat that something as tart and sour as balsamic vinegar turns into something sweeter then maple syrup, all just from heat.
From www.molliekatzen.com:
Roasting apples, which is basically a high-temperature baking process with no added liquid, gives them a wonderful, deepened flavor and a great chewy texture. You can serve Roasted Apples as a snack or a dessert, with or without a platter of cheeses. You can also gussy them up with some Balsamic Drizzle (recipe follows).
This is more a method than it is an exact recipe. Roast any amount of apples, and use any kind except red delicious, which are OK for eating but don't cook well. I like to use tart varieties, because they become sweeter during the roasting process. The inner moisture evaporates and natural sugars caramelize and intensify.
NOTE: You can make the Balsamic Drizzle several days ahead or while the apples roast. You can also skip it, as the apples are delicious plain as well.
Nonstick spray
Apples (any number, and any type but red delicious)
Apples (any number, and any type but red delicious)
- Preheat the oven to 425°F.
- Spray a ceramic baking dish with nonstick spray.
- Core the apples, and cut them into fairly large chunks, leaving the peel on. (If the fruit is peeled, it tends to fall apart.)
- Place the chunks either peel side-down or on their sides in the baking dish. Spacing is unimportant, since the fruit shrinks as it roasts. Just make sure the pieces are in a single layer. Put the dish into the preheated oven for about 30 minutes or until the apples are done just the way you like them. This is a very subjective process .
- When the fruit feels tender to the touch (or a fork slides easily into the flesh) remove the dish from the oven, and transfer the apples to a plate or a platter with a rim.
DEGLAZING
At this point, you can deglaze the pan with a little apple juice (about 1/4 cup). To deglaze, just add the juice to the dish after the fruit has been removed, and scrape and swish it around with a wooden spoon to catch all the glazed fruit tidbits that have stuck during the roasting process. When you've scraped up all the bits and stirred it well in the pan, transfer to a small bowl (straining optional) or pour it directly over the roasted fruit.
BALSAMIC DRIZZLE
Adapted from Mollie Katzen's Vegetable Heaven
Preparation time: 30 minutes (1 minute of work)
Yield: 1/3 cup (easily multiplied)
Preparation time: 30 minutes (1 minute of work)
Yield: 1/3 cup (easily multiplied)
- Balsamic vinegar, that musty, dark, aged-in-wood variety many of us have fallen in love with, makes a wonderful syrup when cooked down to about one-third its original volume. You can drizzle this amazing stuff over more foods than you'd ever imagine„everything from roasted vegetables and bean soups to potato dishes and homemade pizzettas. It's even great on pancakes, fruit, and frozen desserts, especially fruit sorbets. This might just be the most versatile one-ingredient sauce ever.
- You don't need to use an expensive brand of vinegar for this recipe. In fact, the ordinary, more moderately priced supermarket varieties work the best.
- Store Balsamic Drizzle in a covered container at room temperature. Theoretically it will keep forever, but undoubtedly you will use it up sooner than that. If it does sit around, though, it tends to harden, and that is easily fixed. Simply zap it for about 15 seconds in a microwave oven, and it will soften up again.
1 cup balsamic vinegar
- Place the vinegar in a shallow saucepan and heat to boiling. (You might want to open your kitchen windows„this gives off strong fumes!)
- Turn the heat way down, and simmer uncovered for about 30 minutes, or until the vinegar is reduced in volume by about two-thirds.
- Transfer to a bowl, cover tightly, and store indefinitely at room temperature.
I then added a dollop of plain greek yogurt. Also, I put about a tablespoon of honey in the balsamic vinegar while it was reducing, but that's not necessary at all.
A couple of cautions:
1) do this with the windows WIDE OPEN and the fans on.
2) there's the sweet spot of the balsamic glaze being "just so" and burnt to heck. Watch it very carefully at the end. It's finished when it leaves a dark brown, almost black, thick coat on the spoon.
Enjoy!!
Sunday, July 25, 2010
Raspberry Brown Sugar Gratin
In honor of Dave and Kathy's visit, and of the nearly six pounds of berries I picked, I made this gratin. Except, I didn't use raspberries, I used blueberries. And I didn't use creme fraiche, I used thickened yogurt. And I didn't even use half of the sugar, nor did I put it through a sieve because that didn't work. So of the three ingredients, I used none of them correctly. It was still tasty, though.
From Smitten Kitchen:
There are a lot of ways you can play around with this — flavoring the sour cream with lemon, vanilla, cinnamon or almond; using a mix of berries, etc. — but it is flawless the way it is. Want to fancy it up for fancy people? Make it in individual ramekins or tiny gratin dishes.
[Updated to add] Ooh, I just had an idea — Swap thick, full-fat Greek-style yogurt swapped for sour cream and serve it at a brunch to what I have to imagine would be a round of applause. Or at least I’d applaud.
1 pint (2 cups) fresh raspberries (or your choice of berry)
1 pint (2 cups) sour cream (or crème fraîche)
1 cup dark brown sugar
Preheat broiler. Gently fold raspberries and sour cream together in a shallow 1-quart dish. Press the brown sugar through a sieve or mesh colander so that it sprinkles evenly over the dish. (I tried using a sifter; don’t bother, it doesn’t work.) Run the dish under the broiler until the sugar just starts to caramelize. Eat at once.
Keeping: The leftovers might look like something died in your fridge but I can assure you, are equally delicious.
From Smitten Kitchen:
There are a lot of ways you can play around with this — flavoring the sour cream with lemon, vanilla, cinnamon or almond; using a mix of berries, etc. — but it is flawless the way it is. Want to fancy it up for fancy people? Make it in individual ramekins or tiny gratin dishes.
[Updated to add] Ooh, I just had an idea — Swap thick, full-fat Greek-style yogurt swapped for sour cream and serve it at a brunch to what I have to imagine would be a round of applause. Or at least I’d applaud.
1 pint (2 cups) fresh raspberries (or your choice of berry)
1 pint (2 cups) sour cream (or crème fraîche)
1 cup dark brown sugar
Preheat broiler. Gently fold raspberries and sour cream together in a shallow 1-quart dish. Press the brown sugar through a sieve or mesh colander so that it sprinkles evenly over the dish. (I tried using a sifter; don’t bother, it doesn’t work.) Run the dish under the broiler until the sugar just starts to caramelize. Eat at once.
Keeping: The leftovers might look like something died in your fridge but I can assure you, are equally delicious.
Monday, January 25, 2010
Chocolate Chip Cookie Dough Truffles
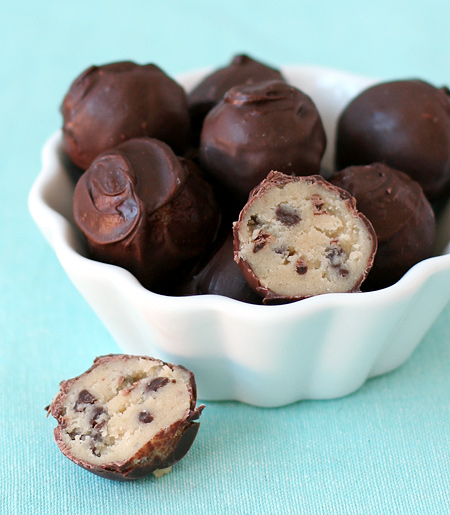
I got this from one of my new favorite blogs-by-people-I-don't know, Love and Olive Oil.
Makes approx. 3-4 dozen.
Ingredients
- 2 1/2 cups all purpose flour
- 1 teaspoon salt
- 1/4 teaspoon baking soda
- 1 cup (2 sticks) butter or margarine, room temperature
- 3/4 cup granulated sugar
- 3/4 cup packed brown sugar
- 1 teaspoon vanilla
- 1/3 cup milk or soy milk
- 1 cup mini semi-sweet chocolate chips
- 14 oz dark chocolate candy coating (or 14 oz dark chocolate if you want to try tempering the chocolate)
- Beat butter and sugars and in large bowl with electric mixer on medium speed until light and fluffy. Add soymilk and vanilla. Stir in flour, baking soda and salt and mix on low speed (or by hand) until incorporated. Stir in chocolate chips.
- Cover and chill dough for 1 hour.
- When dough is firm enough to handle (it may help to lightly flour your hands), form dough into 1″ balls and arrange on a baking sheet lined with waxed paper. Place sheets in freezer and let chill for 30 minutes.
- Melt chocolate candy coating in a double boiler or in microwave according to package directions. Using forks or a dipping tool, dip cookie balls into candy coating to cover. Tap fork on side of pan to remove any excess coating, and return to waxed paper-lined baking sheets. Chill until set. Store, chilled, in an airtight container for up to 1 week (though good luck making them last that long).
At some point in the middle of making these I was struck with the thought of how they were just wrong. We all crave raw cookie dough, but it's the danger of the raw eggs that keeps us from indulging. (and, let's face it, that danger is part of the appeal, no?) And now here's this recipe that says, go ahead, eat all the raw cookie dough you want. It won't kill you, at least, not immediately. But, believe me, they are oh so good. Chris is very mad that I took some to a party and am sending another batch to my old (and now redux) office in Bloomington.
I say make the balls whatever size you want. I yet again used my melon baller. I have yet to use that thing to ball melons, but it gets a lot of use.
If you're wondering, like I am, why the recipe includes baking soda when there's no need for leavening, the author said it adds a little something to lend to the authenticity of the cookie taste. Leave it out if you don't want it.
Tuesday, November 17, 2009
Baked Seasonal Fruit
This is from that same Washington Post article as La Farinata.
Use whatever fruit at the farmers market is at its peak. In the summer, D.C. cook Deborah Thawley likes to use peaches, nectarines, plums or figs. In the fall she uses pears and apples, often adding blueberries or blackberries in the last 10 minutes of oven time. And she sometimes adds thin slices of lemon or orange peel, dried fruit, for another flavor.
Two tablespoons of whiskey can be used instead of the sugar and lime or lemon juice.
This dish is best served right after it is made.
4 servings
Ingredients:
* • Juice of 1 lime or lemon (2 to 3 teaspoons)
* • 2 medium apples, cut in half and cored
* • 2 medium pears, firm and well-flavored
* • 1 tablespoon sugar, preferably vanilla sugar (see NOTE)
Directions:
Preheat the oven to 425 degrees. Sprinkle the juice in the bottom of a medium gratin or baking dish.
Place the pears and apples cut side down in the gratin or baking dish. Sprinkle the sugar evenly over the top of the fruit. Roast for about 45 minutes, until the skin of the fruit is well browned and slightly puffed. Serve warm.
NOTE: To make sugar with a vanilla perfume, submerge a vanilla bean in a tightly closed container of sugar for at least a week before using.
Results:
I like the versatility of this recipe, how you can use whatever fruit you like and whatever is in season. Having said that, I think some fruits are going to be better than others. I used an apple that wasn't great for cooking, so it got really mushy, like apple sauce. I also thew some cranberries in toward the end. Cranberries are really tart without sugar. The whole thing tasted a bit like a sweet-tart. I made it for breakfast and it certainly woke us up! But, maybe not the best combo.
Sunday, November 1, 2009
Ginger Snaps
I really really wanted to make Chris's mom's recipe for Gingerbread cookies last weekend, but it was in my email and our internet had decided to stop working during the snow storm. So, I couldn't do that, but I had my heart set on gingerbread, and I already had the ginger, so I dug this recipe out from Alice Water's Simple Cooking.
Ingredients:
I really liked these. I under-baked them a little at 9 minutes, they should definitely stay in for at least 10. They were definitely not snappy. I didn't add the pepper, but I think I might the next time. Undoubtedly not as good as Kathy's recipe would have been, but now that the Internets are working again I'll give that a shot soon.
Ingredients:
- 2 cups (9.5 oz or slightly more) flour
- 1½ teaspoons baking soda
- ½ teaspoon salt
- 2 teaspoons ground cinnamon
- 1½ teaspoons ground ginger
- ½ teaspoon ground black pepper (optional)
- 11 tablespoons butter, salted or unsalted, at room temperature
- 2/3 cup sugar
- ½ teaspoon vanilla extract
- ¼ cup molasses
- 1 large egg, at room temperature
- Stir together the dry ingredients.
- Beat the butter just until soft and fluffy. Add the sugar and continue to beat until smooth.
- Stir in the vanilla, molasses and egg.
- Mix in the dry ingredients gradually until the dough is smooth.
- Divide the dough in two equal portions and roll each on a lightly-floured surface until each is about 2-inches (5cm) around. Don't worry if they're not perfect; you can neaten them up in a second.
- Wrap each in plastic wrap then roll them lightly on the counter to smooth them out. Refrigerate for two hours, or better yet, freeze the cookie logs until firm (30 minutes or so).
- To bake, preheat the oven to 350F and line two baking sheets with parchment paper or silicone baking mats.
- Slice cookie dough into 1/4-inch rounds with a sharp knife. Place sugar-side up on baking sheet, evenly-spaced apart. Leave a couple of inches between cookies since they'll spread while baking.
- Bake for 10-14 minutes, rotating the baking sheets midway during baking, until deep-golden brown. The cookies will puff up a bit while baking, then settle down when they're done. Bake on the lower end of the range for softer cookies, and more for snappier ones, depending on your oven.
- Let the cookies cool two minutes, then remove them with a spatula and transfer them to a cooling rack.
I really liked these. I under-baked them a little at 9 minutes, they should definitely stay in for at least 10. They were definitely not snappy. I didn't add the pepper, but I think I might the next time. Undoubtedly not as good as Kathy's recipe would have been, but now that the Internets are working again I'll give that a shot soon.
Friday, June 12, 2009
Cookie Backslide

Chris actually preferred my status quo cookies, the ones that are slightly gooey, mushy, a little greasy. So, I thought I'd try to adjust the Chocolate Chip Cookie #10 to make them a little chewier for him. I compared the #10 to the Nestle Toll House recipe, and the only difference, really, is that #10 calls for two egg yolks instead of two whole eggs, and the cooking time is longer but slower, since it's at the same temperature but all the cookies are in there at the same time (lowering the temperature of the oven). I thought I'd change the egg thing, adding one whole egg and one egg yolk instead of two egg yolks, just to see what happened. It was really unsuccessful. As you can see, they all melted together into a cookie glob. Very greasy.
It could be the eggs that did it. Or, it could be that my baking soda is flat and that's why the cookies didn't rise. But I think it went wrong from the beginning. I think I over-melted the butter. I sort of forgot about it in the microwave and by the time it beeped the butter was foaming, and the milk solids separated from the liquid. The butter and sugar just never creamed right even though I was beating it for something like 10 minutes, and it all went downhill from there.
I think in the future I'll not melt the butter. Actually, I don't know why it called for the butter to be melted in the first place; Alton kept making a big deal about how to properly cream something the butter CAN'T be melted. So it would seem to me that melting the butter is the WRONG thing to do, even if I hadn't over melted it. Hmmmm....
It could be the eggs that did it. Or, it could be that my baking soda is flat and that's why the cookies didn't rise. But I think it went wrong from the beginning. I think I over-melted the butter. I sort of forgot about it in the microwave and by the time it beeped the butter was foaming, and the milk solids separated from the liquid. The butter and sugar just never creamed right even though I was beating it for something like 10 minutes, and it all went downhill from there.
I think in the future I'll not melt the butter. Actually, I don't know why it called for the butter to be melted in the first place; Alton kept making a big deal about how to properly cream something the butter CAN'T be melted. So it would seem to me that melting the butter is the WRONG thing to do, even if I hadn't over melted it. Hmmmm....
Sunday, April 5, 2009
Chocolate Chip Cookie #10

Some of you may know that I've been having a couple crises over the last few years. One is my pie crust crisis. Ever since I've graduated from college, I just can't pull together a good pie crust, and the more I try (fancy recipes, ice water, using shortening AND butter) the worst they get. But that's a battle to fight another day, because yesterday I got a different monkey off my back: the chocolate chip cookie. My cookies have been turning into flat, anemic-looking rubber disks that burnt on the edges, stayed raw in the middle, and glommed together in the cookie jar so badly they turned into a chocolate chip mass. No longer, my friends! These cookies remained discreet, each one delicious and distinguishable from the next. This picture is of my actual cookies. And, they were pretty darn tasty, too. Huzzah!
In celebration of this achievement, I'm going to actually TYPE UP a long recipe from a cookbook. Normally, I'll do a search on the Google for a recipe from a cookbook, and if I can't find it, I don't post it. (sorry!) But this is a remarkable day. Enjoy. It's from Alton Brown's I'm Just Here for More Food, which I like, among many other reasons, because it includes the weight and volume of the ingredients.
Dry Ingredients:
10 3/4 oz or 2 1/4 cups all purpose flour
1 teaspoon baking soda
1 teaspoon salt
Wet Ingredients:
5 1/3 oz or 3/4 cup sugar
5 oz or 3/4 cup brown sugar
2 sticks unsalted butter* melted and slightly cooled
2 large egg yolks
1 teaspoon vanilla extract
Other: 2 cups chocolate chips
Combine the dry ingredients well (Alton recommends using a food processor. I used a whisk). In a mixing bowl, cream the butter and the sugar well, until you can't see the individual sugar particles but you can still feel them, and the butter has lightened in color and doubled in volume. Add the egg yolks one at a time, then the vanilla. Then gradually add the dry goods, mix just until combined, then fold in the chips.
Using a 1-ounce disher**, scoop 24 portions onto two ungreased baking sheets. At this stage, the cookies can be frozen on the pans then moved to zip-top bags, they'll keep for 3 months.
Bake for 15 to 17 minutes, or until golden brown (I rotated the pans halfway through, both between the two racks and I rotated each pan so the back was put to the front). Let the cookies cool on the baking sheets for 2 minutes, then remove to a rack to cool completely.
RESULTS: Well, you already know how I feel about these cookies. They weren't the best fresh, though, they had some crumbly grandularness to them, which evened out after resting overnight in the cookie jar. They had some good butteriness and also just enough saltiness. I will never make another chocolate chip cookie recipe. This is it, love at first sight.
*I was running out of butter, and I had a stick of margarine left over from before I swore off margarine, so I used one stick of margarine and one stick butter. I'm not sure how that affected the results, we'll have to see the next time I make them. Also, the butter, though almost soft, wasn't QUITE soft. Again, I don't know how that affected the results.
**I didn't have a 1-oz scooper, but I didn't really need it. The batter was more of a paste, and it was pretty easy to just split it in half, put half on each cookie sheet, then continue halving and, uh, thirding(?) until I had 12 equal portions on each sheet.
Wednesday, March 18, 2009
Lemon Curd Tart (aka, lemonade pudding pie)
Feeling spring-like (and lemons were REALLY cheap at Kroger) I felt like making lemon curd tart from the Alice Waters book. Chris said it sounded not so appetizing, so I redubbed it lemonade pudding pie.
Curd/Pudding:
Makes 2 cups
Wash and dry:4 lemons
Grate the zest of one of the lemons on the small holes of a grater. Juice the lemons; there should be about ½ cup juice.
Beat until just mixed:
2 eggs
3 egg yolks
2 tablespoons milk
1/3 cup sugar
¼ teaspoon salt (omit if using salted butter)
Stir in the lemon juice and zest and add:
6 tablespoons butter, cut into small pieces.
Cook the mixture in a small nonreactive heavy pan, stirring constantly, over medium heat until it is thick enough to coat a spoon. Do not boil or the eggs will curdle. When thick, pour into a bowl or glass jars to cool. Cover and refrigerate.
Variations: With their sweeter juice and perfumed peel, Meyer lemons make an especially good curd.
Tart/Pie:
Fill a pre-baked 9-inch tart shell (I used a non-pre-baked graham cracker store bought pie shell since I don't have any tart pans) with the 2-cups lemon curt (aka lemonade pudding). Smooth out the curd/pudding and bake in a 375 degree oven for 15 to 20 minutes or until curd is set.
RESULTS: Delicious. Tart. Lemony.
One thing is I don't know how one tells when the curd is "set". It was still jiggly and seemed pretty-unset when I finally gave up and pulled it out of the oven after 25 minutes, but when it cooled it was perfectly firm. So I don't know what to tell you. The other thing is that when I was cooking the curd itself over the stove, it thickened in, literally, 5 seconds. I was stirring, stirring, stirring for a few minutes and BAM, suddenly it was thick. I guess the eggs just suddenly all got to the right temperature. Just something to keep in mind. Don't walk away from this one!
Curd/Pudding:
Makes 2 cups
Wash and dry:4 lemons
Grate the zest of one of the lemons on the small holes of a grater. Juice the lemons; there should be about ½ cup juice.
Beat until just mixed:
2 eggs
3 egg yolks
2 tablespoons milk
1/3 cup sugar
¼ teaspoon salt (omit if using salted butter)
Stir in the lemon juice and zest and add:
6 tablespoons butter, cut into small pieces.
Cook the mixture in a small nonreactive heavy pan, stirring constantly, over medium heat until it is thick enough to coat a spoon. Do not boil or the eggs will curdle. When thick, pour into a bowl or glass jars to cool. Cover and refrigerate.
Variations: With their sweeter juice and perfumed peel, Meyer lemons make an especially good curd.
Tart/Pie:
Fill a pre-baked 9-inch tart shell (I used a non-pre-baked graham cracker store bought pie shell since I don't have any tart pans) with the 2-cups lemon curt (aka lemonade pudding). Smooth out the curd/pudding and bake in a 375 degree oven for 15 to 20 minutes or until curd is set.
RESULTS: Delicious. Tart. Lemony.
One thing is I don't know how one tells when the curd is "set". It was still jiggly and seemed pretty-unset when I finally gave up and pulled it out of the oven after 25 minutes, but when it cooled it was perfectly firm. So I don't know what to tell you. The other thing is that when I was cooking the curd itself over the stove, it thickened in, literally, 5 seconds. I was stirring, stirring, stirring for a few minutes and BAM, suddenly it was thick. I guess the eggs just suddenly all got to the right temperature. Just something to keep in mind. Don't walk away from this one!
Monday, January 26, 2009
Buttermilk Panna Cotta

2 tablespoons water
1 1/2 teaspoons unflavored gelatin
Nonstick vegetable oil spray
1 cup whipping cream
1 teaspoon finely grated lemon peel
1/2 cup sugar
2 cups buttermilk
2 teaspoons vanilla extract
Assorted frozen berries (such as blackberries, blueberries, and raspberries), thawed
Pour 2 tablespoons water into small bowl; sprinkle gelatin over. Let stand until gelatin softens, about 10 minutes. Lightly spray six 3/4-cup ramekins or custard cups with nonstick spray.
Heat cream, lemon peel, and sugar in medium saucepan over medium-high heat, stirring constantly until sugar dissolves. Increase heat and bring just to low boil, stirring occasionally. Add gelatin mixture; remove from heat. Stir until gelatin dissolves. Cool mixture to lukewarm, stirring often. Stir in buttermilk and vanilla; divide mixture among prepared ramekins. Refrigerate panna cotta until set, about 4 hours. DO AHEAD: Can be made 2 days ahead. Cover and keep chilled.
Using small sharp knife, cut around panna cotta in each ramekin. Place plate atop each ramekin and invert, allowing panna cotta to settle onto plate. Top with berries and serve chilled.
RESULTS: This was amazing, and it could not have been easier. I also made this for Brad, Suz and Chris. People on Epicurious.com said it was a little runny and they recommended just using a whole packet of gelatin, which I did and it was not runny. They also thought that the cooking spray added a flavor and that the hardest part was actually turning the panna cotta out of a plate, so I decided to forego that and just eat them out of the ramekins. As Suz said, who doesn't like to eat things out of little pots? Seriously. Make this. If you're lactose intolerant like certain sisters of mine, make it with your fake milk, I bet it'll still work. The buttermilk added, I thought, a delightful zing, but if you don't have buttermilk, I bet you can use regular. Try it! It's soooooo good! I had some leftovers for breakfast. Mmmmm.
1 1/2 teaspoons unflavored gelatin
Nonstick vegetable oil spray
1 cup whipping cream
1 teaspoon finely grated lemon peel
1/2 cup sugar
2 cups buttermilk
2 teaspoons vanilla extract
Assorted frozen berries (such as blackberries, blueberries, and raspberries), thawed
Pour 2 tablespoons water into small bowl; sprinkle gelatin over. Let stand until gelatin softens, about 10 minutes. Lightly spray six 3/4-cup ramekins or custard cups with nonstick spray.
Heat cream, lemon peel, and sugar in medium saucepan over medium-high heat, stirring constantly until sugar dissolves. Increase heat and bring just to low boil, stirring occasionally. Add gelatin mixture; remove from heat. Stir until gelatin dissolves. Cool mixture to lukewarm, stirring often. Stir in buttermilk and vanilla; divide mixture among prepared ramekins. Refrigerate panna cotta until set, about 4 hours. DO AHEAD: Can be made 2 days ahead. Cover and keep chilled.
Using small sharp knife, cut around panna cotta in each ramekin. Place plate atop each ramekin and invert, allowing panna cotta to settle onto plate. Top with berries and serve chilled.
RESULTS: This was amazing, and it could not have been easier. I also made this for Brad, Suz and Chris. People on Epicurious.com said it was a little runny and they recommended just using a whole packet of gelatin, which I did and it was not runny. They also thought that the cooking spray added a flavor and that the hardest part was actually turning the panna cotta out of a plate, so I decided to forego that and just eat them out of the ramekins. As Suz said, who doesn't like to eat things out of little pots? Seriously. Make this. If you're lactose intolerant like certain sisters of mine, make it with your fake milk, I bet it'll still work. The buttermilk added, I thought, a delightful zing, but if you don't have buttermilk, I bet you can use regular. Try it! It's soooooo good! I had some leftovers for breakfast. Mmmmm.
Monday, December 8, 2008
Peanut Chocolate Toffee
 Peanut Chocolate Toffee
The transformation of butter, sugar, and salt into toffee is culinary alchemy at its best. This version is studded with cocktail peanuts and a decadent layer of bittersweet chocolate.
Yield: Makes about 3 poundsActive Time: 45 min
Total Time: 1 3/4 hr

4 sticks (1 pound) unsalted butter, cut into pieces
2 cups sugar
1/4 teaspoon salt
4 cups whole cocktail peanuts plus 1 cup chopped (1 pound 10 ounces)
7 to 8 ounces 70%-cacao bittersweet chocolate, finely chopped
Equipment: a 15- by 10- by 1-inch baking pan; a candy thermometer; a metal offset spatula
2 cups sugar
1/4 teaspoon salt
4 cups whole cocktail peanuts plus 1 cup chopped (1 pound 10 ounces)
7 to 8 ounces 70%-cacao bittersweet chocolate, finely chopped
Equipment: a 15- by 10- by 1-inch baking pan; a candy thermometer; a metal offset spatula

Butter baking pan and put on a heatproof surface.
Bring butter, sugar, and salt to a boil in a 4- to 5-quart heavy pot over medium-high heat, whisking until smooth, then boil, stirring occasionally, until mixture is deep golden and registers 300°F (hard-crack stage; see Kitchen Notebook, page 240) on thermometer, 15 to 20 minutes.
Immediately stir in whole peanuts, then carefully pour hot toffee into center of baking pan. Spread with spatula, smoothing top, and let stand 1 minute, then immediately sprinkle chocolate on top. Let stand until chocolate is melted, 4 to 5 minutes, then spread over toffee with cleaned spatula. Sprinkle evenly with chopped peanuts, then freeze until chocolate is firm, about 30 minutes. Break into pieces.
Cooks' note:
Toffee keeps, layered between sheets of parchment paper, in an airtight container at cool room temperature 2 weeks.
Cooks' note:
Toffee keeps, layered between sheets of parchment paper, in an airtight container at cool room temperature 2 weeks.
RESULTS: Love! I made these for a cookie exchange/charity for the poor grad students in our office to take home. They were pretty excited about it, so I think it turned out ok. I decided to make the toffee because I just don't think I use my candy thermometer enough. With Epicurious, I always check the reviews of other people, and those people had some really good tips for keeping the butter from separating (using salted butter instead of unsalted and leaving out the extra salt, boiling it for longer over lower heat, etc). They also recommended cutting back on the whole peanuts to 2 cups (in addition to the 1 cup of chopped nuts), which I did (I mixed regularly salted cocktail peanuts and lightly salted), and I added vanilla extract, which was delicious. I think you could do 3 cups of whole peanuts, but I don't think I would like 4 cups of whole peanuts, plus the chopped. Too many peanuts. Here's a link to the website so you can check them out for yourself.
A note of warning, there was a LOT of stirring. Also, it's really helpful to have everything chopped that needs to be chopped before the sugar and butter hit the heat. And some toffee-making music, as there was a LOT of stirring. A LOT.
One final tip: The only pan I had that was even close to being as big as this recipe called for was that enchilada pan I got from CVS, but it was still too small and the toffee came out too thick to break into small pieces in some spots. The toffee "batter" had a fairly high vicosity, so I was thinking I might try putting it on a cookie sheet next time, as those are pretty long and wide, even though they don't have edges to keep everything in. I just won't spread to the edges.
Thursday, October 30, 2008
Butter Rum Pound Cake
From Cooking Light:
Butter, a classic ingredient in pound cake, contributes to the flavor and tender texture of this dense, rich dessert. Slices of leftover cake are good toasted and garnished with fresh fruit.
Yield
12 servings (serving size: 1 slice)
Ingredients
Cake:
Cooking spray
2 tablespoons all-purpose flour
1 1/2 cups all-purpose flour (about 6 3/4 ounces)
1/4 teaspoon baking powder
1/4 teaspoon baking soda
1/4 teaspoon salt
1 cup granulated sugar
1/2 cup butter, softened
2 large eggs
1/2 cup spiced rum (such as Captain Morgan's)
Glaze:
1 cup powdered sugar
1 1/2 tablespoons spiced rum (such as Captain Morgan's)
Preparation
Preheat oven to 350°.
To prepare cake, coat an 8 x 4 inch loaf pan with cooking spray; dust with 2 tablespoons flour.
Lightly spoon 1 1/2 cups flour into dry measuring cups; level with a knife. Combine 1 1/2 cups flour, baking powder, baking soda, and salt, stirring with a whisk until blended.
Place granulated sugar and butter in a large bowl; beat with a mixer at medium speed until well blended (about 5 minutes). Add eggs, 1 at a time, beating well after each addition. Add flour mixture and 1/2 cup rum alternately to sugar mixture, beginning and ending with flour mixture. Spoon batter into prepared pan. Bake at 350° for 50 minutes or until a wooden pick inserted in center comes out clean. Cool in pan 10 minutes on a wire rack. Run a knife around edges of pan; remove cake from pan. Cool completely on wire rack.
To prepare glaze, combine powdered sugar and 1 1/2 tablespoons rum, stirring until smooth. Drizzle glaze over the cake.
RESULTS: I was a bit distracted when I was making this the other night because "It's the Great Pumpkin Charlie Brown" was on TV, and I put in 1/2 lb of butter instead of 1/2 c. For those of you keeping score, that's twice as much. I didn't realize I had put too much in until I was lying in bed, calculating the tablespoons of butter per serving of my nice golden brown (and delicious) pound cake cooking on the counter, thinking to myself, how on earth was that in Cooking Light? And then I realized. Sigh! Chris figured that probably brought the butter content up to about what a normal pound cake is. So much for being healthy.
That said, a few of the reviewers online were disappointed that they could neither taste the butter nor the rum. I had no trouble with tasting the butter. I was a little worried about the rum because the recipe called for spiced rum and all we had was dark rum, but I thought it came through, albeit mostly in the icing. So, I can't speak for the actual recipe tasting good, but the pound cake I made tasted REALLY good.
Butter, a classic ingredient in pound cake, contributes to the flavor and tender texture of this dense, rich dessert. Slices of leftover cake are good toasted and garnished with fresh fruit.
Yield
12 servings (serving size: 1 slice)
Ingredients
Cake:
Cooking spray
2 tablespoons all-purpose flour
1 1/2 cups all-purpose flour (about 6 3/4 ounces)
1/4 teaspoon baking powder
1/4 teaspoon baking soda
1/4 teaspoon salt
1 cup granulated sugar
1/2 cup butter, softened
2 large eggs
1/2 cup spiced rum (such as Captain Morgan's)
Glaze:
1 cup powdered sugar
1 1/2 tablespoons spiced rum (such as Captain Morgan's)
Preparation
Preheat oven to 350°.
To prepare cake, coat an 8 x 4 inch loaf pan with cooking spray; dust with 2 tablespoons flour.
Lightly spoon 1 1/2 cups flour into dry measuring cups; level with a knife. Combine 1 1/2 cups flour, baking powder, baking soda, and salt, stirring with a whisk until blended.
Place granulated sugar and butter in a large bowl; beat with a mixer at medium speed until well blended (about 5 minutes). Add eggs, 1 at a time, beating well after each addition. Add flour mixture and 1/2 cup rum alternately to sugar mixture, beginning and ending with flour mixture. Spoon batter into prepared pan. Bake at 350° for 50 minutes or until a wooden pick inserted in center comes out clean. Cool in pan 10 minutes on a wire rack. Run a knife around edges of pan; remove cake from pan. Cool completely on wire rack.
To prepare glaze, combine powdered sugar and 1 1/2 tablespoons rum, stirring until smooth. Drizzle glaze over the cake.
RESULTS: I was a bit distracted when I was making this the other night because "It's the Great Pumpkin Charlie Brown" was on TV, and I put in 1/2 lb of butter instead of 1/2 c. For those of you keeping score, that's twice as much. I didn't realize I had put too much in until I was lying in bed, calculating the tablespoons of butter per serving of my nice golden brown (and delicious) pound cake cooking on the counter, thinking to myself, how on earth was that in Cooking Light? And then I realized. Sigh! Chris figured that probably brought the butter content up to about what a normal pound cake is. So much for being healthy.
That said, a few of the reviewers online were disappointed that they could neither taste the butter nor the rum. I had no trouble with tasting the butter. I was a little worried about the rum because the recipe called for spiced rum and all we had was dark rum, but I thought it came through, albeit mostly in the icing. So, I can't speak for the actual recipe tasting good, but the pound cake I made tasted REALLY good.
Sunday, October 12, 2008
Buckeyes
Makes about 30
2 cups sifted confectioners' sugar
3/4 cup smooth peanut butter
4 tbsp. unsalted butter, melted
1/2 tsp. vanilla extract
1/4 tsp. salt
6 oz. semisweet chocolate chips
1/2 tsp. vegetable shortening
1. Put sugar, peanut butter, butter, vanilla, and salt into a mixing bowl and beat well with a wooden spoon. Roll peanut butter mixture into 1" balls and transfer to a wax paper–lined cookie sheet in a single layer. Freeze until firm, 15–20 minutes.
2. Melt chocolate and shortening in a small heatproof bowl set over a small pot of simmering water, stirring often. Remove pot and bowl together from heat.
3. Working with about 6 peanut butter balls at a time, insert a toothpick into the center of a ball and dip about three-quarters of the ball into the melted chocolate, leaving about a I" circle of peanut butter visible at the top. Twirl toothpick between your finger and thumb to swirl off excess chocolate, then transfer to another wax paper–lined cookie sheet, chocolate side down. Slide out toothpick and repeat dipping process with remaining peanut butter balls and chocolate, reheating chocolate if necessary.
4. Freeze buckeyes until firm. Smooth out toothpick holes left in peanut butter. Buckeyes will keep well sealed in cool place for up to 1 week and up to 2 weeks in refrigerator. Serve at room temperature or chilled.
RESULTS: How can you go wrong? It's nice when I can make something to help Chris connect to his Ohio roots, even though he's not an OSU fan, and it's a bonus when that thing is the Greatest Flavor Combination Of All Time.
I just have two notes. It's easier to roll the peanut butter into balls if you sort of squeeze it in your hand for a little bit to warm it up a little; otherwise it gets a little crumbly. Also, I guess I make my balls too small or something, but I've made this twice so far and ran out of chocolate both times, so I would make sure you have a whole 12 oz bag of chocolate chips on hand, just in case you need to melt more.
Saturday, August 16, 2008
Orange Cookies
Remember those lime cookies I made a while ago? I brought them into work and Ross said that his mom makes orange cookies, which are his favorite cookies in the world. Six months later, she sent him the recipe to give to me. It seems to be from a church cookbook fundraiser, one in which everyone knows the contributers and would enjoy the little anecdotes about how Mrs. Wallace and her daughter have differing baking strategies. :) That was a nice touch. This made about twice as many cookies as a nestle toll house recipe.
2 C. sugar
1 c. Shortening
1 tsp. salt
3 eggs
2 oranges (grated rind and juice)
1 c. buttermilk
4.5 c. flour
1 tsp. baking soda
2 tsp. baking powder
Icing:
1 orange (grated rind and juice)
1 box powdered sugar
1 Tbles butter (optional)
Cream together sugar, shortening, and salt. Add egges, rind, and juice of the 2 oranges and buttermilk. Beat well. Add flour, soda, and baking powder. Blend well. Drop by teaspoonfuls onto greased cookie sheet. Bake at 400 degrees for 15 minutes.
While still warm, frost with icing made from orange rind and juice and sugar, combine until smooth before icing. (I used a knife to spread it on the cookies, working over the icing bowl).
Barbara Dorsey bakes her cookies at 350 for 10 minutes. She also adds 1 tbls butter to icing.
RESULTS: These turned out really light and fluffy. The cookies themselves don't have a lot of flavor, but the icing brings it all together. Because of the two weirdly different cooking times and temperatures, I split the difference and cooked them at 375 for 12 minutes. I think next time I'll try it on the higher temp and the longer time, to see what they would be like a little cruchier.
2 C. sugar
1 c. Shortening
1 tsp. salt
3 eggs
2 oranges (grated rind and juice)
1 c. buttermilk
4.5 c. flour
1 tsp. baking soda
2 tsp. baking powder
Icing:
1 orange (grated rind and juice)
1 box powdered sugar
1 Tbles butter (optional)
Cream together sugar, shortening, and salt. Add egges, rind, and juice of the 2 oranges and buttermilk. Beat well. Add flour, soda, and baking powder. Blend well. Drop by teaspoonfuls onto greased cookie sheet. Bake at 400 degrees for 15 minutes.
While still warm, frost with icing made from orange rind and juice and sugar, combine until smooth before icing. (I used a knife to spread it on the cookies, working over the icing bowl).
Barbara Dorsey bakes her cookies at 350 for 10 minutes. She also adds 1 tbls butter to icing.
RESULTS: These turned out really light and fluffy. The cookies themselves don't have a lot of flavor, but the icing brings it all together. Because of the two weirdly different cooking times and temperatures, I split the difference and cooked them at 375 for 12 minutes. I think next time I'll try it on the higher temp and the longer time, to see what they would be like a little cruchier.
Saturday, August 2, 2008
Chocolate Fritters
1 cup all-purpose flour
Pinch salt
2 1/2 tablespoons sugar
1 lemon, zested
1/4 cup extra-virgin olive oil, plus 2 cups extra-virgin olive oil, for frying (my cookbook says 4 cups)
2 tablespoons sweet white wine (my cookbook says dry white wine)
1/2 cup bittersweet chocolate, chopped medium fine
1/3 cup hazelnuts, toasted and coarsely chopped
1/4 cup apricot jam (cookbook says 1/2 cup)
1 egg, lightly beaten
Honey, for brushing the fritters
Place the flour on a clean work surface and add the salt, sugar, lemon zest, oil, and enough wine to make a firm but tender dough. Knead for 5 minutes, then wrap the dough in plastic and let it rest 30 minutes.
In the meantime, make the filling by combining the chocolate, nuts, and jam and mix with a spoon. Set aside, covered.
(Cookbook says to flour the work surface) Roll the dough out to 1/4-inch thickness and, using a 3-inch cookie cutter, cut out as many circles as possible. Place a dab of filling on each circle of dough, moisten the edges with a bit of beaten egg, and fold each round in half, pressing them shut with finger pressure or a fork.
In a tall-sided pot, heat the oil to 350 degrees F and fry the until they are deep golden brown. Remove with a slotted spoon and drain on paper towels. Brush each fritter with honey and serve hot or cold.
RESULTS: Suz has never seen An Affair to Remember, so I made her come over last night to watch it, and we thought we'd try a recipe that we saw in Mario's cookbook that caught both our eyes. The picture looks gorgeous, almost like perfectly brown hushpuppies with chocolate inside them. Long story short, it was disastrous, and I'm not sure why. The dough was very damp, and I don't know if that'd because of the extreme humidity we've been having or what, but it was damp and greasy. When we put the filling in, the dough teared, and all the chocolate came out when we fried them. They didn't taste moist and gooey like the picture looks like they'd taste, they were oily and crumbly and awful. The filling was extremely tasty, though. Suz thought that maybe it was just a bad recipe, because we followed it really closely. I don't have a lot of frying, much less deep frying, experience, so I wanted to do it by the book, but it was just terrible. At first we thought we didn't have enough flour in it (because of the humidly), but we added some and the dough got really tough really quickly. Also, in the book he says it'll make 18 fritters, and we were rolling the dough as thin as we could without tearing it, much thinner actually than 1/4 inch, and we got 11. We tried making some with thicker dough, and it didn't tear so much, but we couldn't have gotten 18 out of it, and besides it still didn't fry up right. Maybe my oil was too hot? But it was on 350 on the nose.... I don't know...
Anyway, I did a search for the recipe online and I found this, which is exactly the same except for the parts that I noted. Nothing, I think, that would justify the extremely different results than what we got (I do think the filling had a little too much apricot in it, but it was still nice). Anyone have any ideas? I'm stumped. More so because a lady on Amazon says she makes them for her husband all the time, and the online recipe got 5 stars from another lady. I just don't get it!
Pinch salt
2 1/2 tablespoons sugar
1 lemon, zested
1/4 cup extra-virgin olive oil, plus 2 cups extra-virgin olive oil, for frying (my cookbook says 4 cups)
2 tablespoons sweet white wine (my cookbook says dry white wine)
1/2 cup bittersweet chocolate, chopped medium fine
1/3 cup hazelnuts, toasted and coarsely chopped
1/4 cup apricot jam (cookbook says 1/2 cup)
1 egg, lightly beaten
Honey, for brushing the fritters
Place the flour on a clean work surface and add the salt, sugar, lemon zest, oil, and enough wine to make a firm but tender dough. Knead for 5 minutes, then wrap the dough in plastic and let it rest 30 minutes.
In the meantime, make the filling by combining the chocolate, nuts, and jam and mix with a spoon. Set aside, covered.
(Cookbook says to flour the work surface) Roll the dough out to 1/4-inch thickness and, using a 3-inch cookie cutter, cut out as many circles as possible. Place a dab of filling on each circle of dough, moisten the edges with a bit of beaten egg, and fold each round in half, pressing them shut with finger pressure or a fork.
In a tall-sided pot, heat the oil to 350 degrees F and fry the until they are deep golden brown. Remove with a slotted spoon and drain on paper towels. Brush each fritter with honey and serve hot or cold.
RESULTS: Suz has never seen An Affair to Remember, so I made her come over last night to watch it, and we thought we'd try a recipe that we saw in Mario's cookbook that caught both our eyes. The picture looks gorgeous, almost like perfectly brown hushpuppies with chocolate inside them. Long story short, it was disastrous, and I'm not sure why. The dough was very damp, and I don't know if that'd because of the extreme humidity we've been having or what, but it was damp and greasy. When we put the filling in, the dough teared, and all the chocolate came out when we fried them. They didn't taste moist and gooey like the picture looks like they'd taste, they were oily and crumbly and awful. The filling was extremely tasty, though. Suz thought that maybe it was just a bad recipe, because we followed it really closely. I don't have a lot of frying, much less deep frying, experience, so I wanted to do it by the book, but it was just terrible. At first we thought we didn't have enough flour in it (because of the humidly), but we added some and the dough got really tough really quickly. Also, in the book he says it'll make 18 fritters, and we were rolling the dough as thin as we could without tearing it, much thinner actually than 1/4 inch, and we got 11. We tried making some with thicker dough, and it didn't tear so much, but we couldn't have gotten 18 out of it, and besides it still didn't fry up right. Maybe my oil was too hot? But it was on 350 on the nose.... I don't know...
Anyway, I did a search for the recipe online and I found this, which is exactly the same except for the parts that I noted. Nothing, I think, that would justify the extremely different results than what we got (I do think the filling had a little too much apricot in it, but it was still nice). Anyone have any ideas? I'm stumped. More so because a lady on Amazon says she makes them for her husband all the time, and the online recipe got 5 stars from another lady. I just don't get it!
Subscribe to:
Posts (Atom)